Index Page
You did a similar lesson in the previous Web Development coure.
Now that you know about Bootstrap and more HTML / CSS you can liven up your portfolio page!
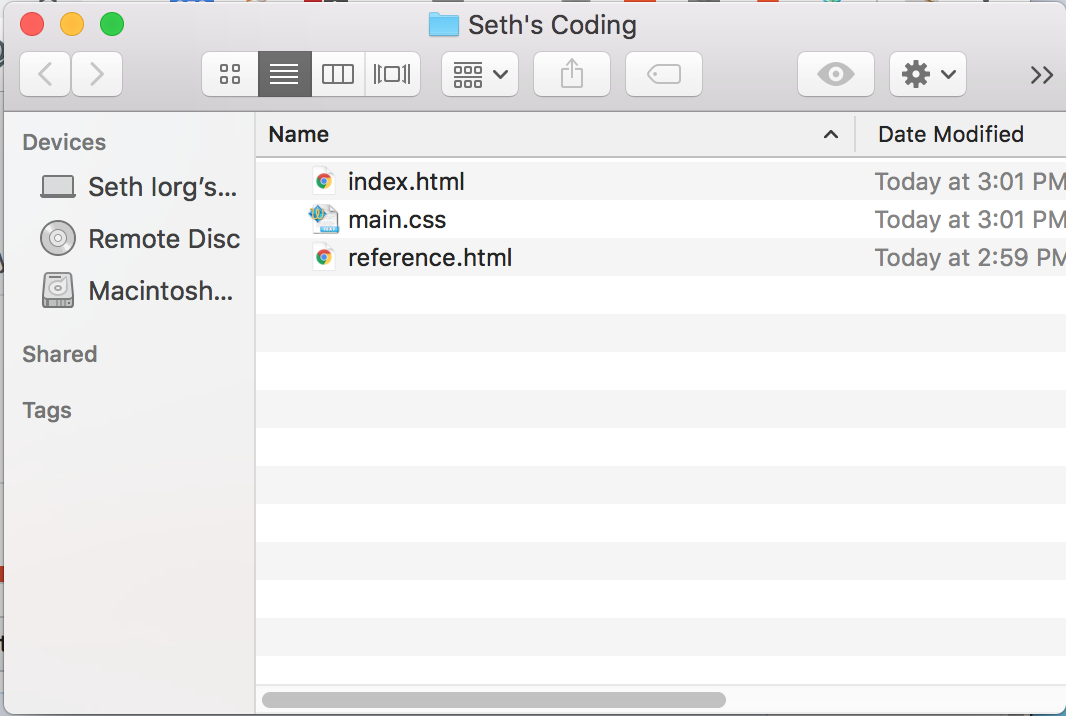
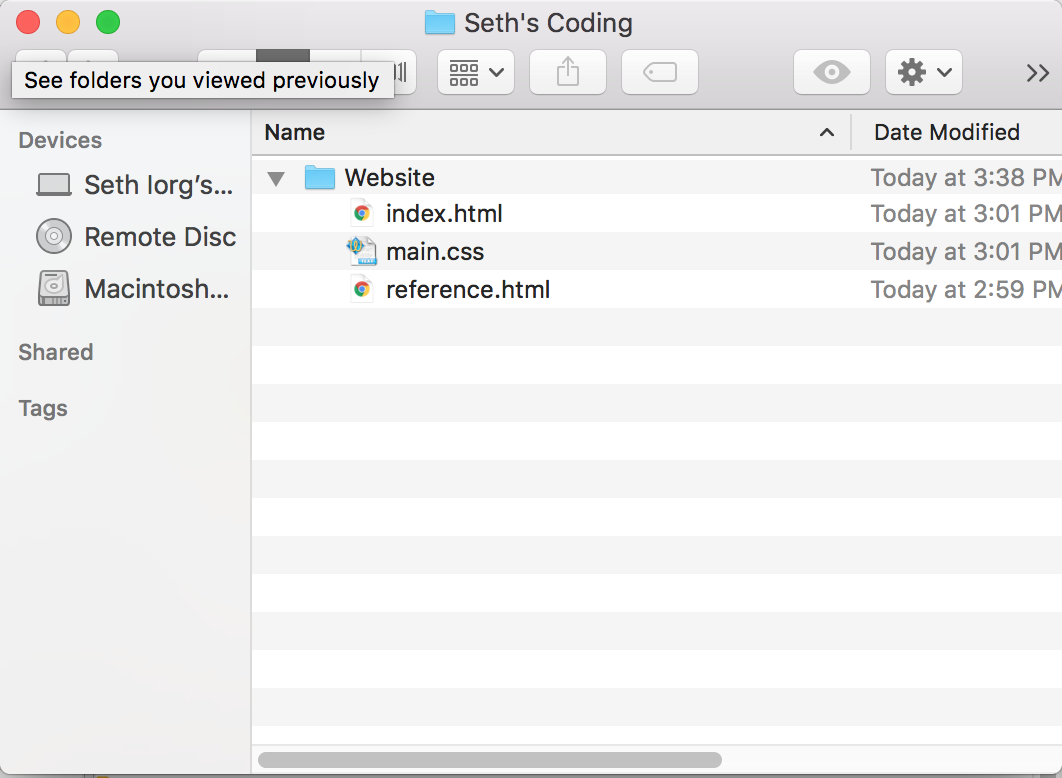
You're current workspace should look something like this:
It may have more folders in there if you've also started other Simply Coding courses.
You're are going to EDIT your main index.html file located in your workspace to customize your portfolio!
When you understand this slide, Click the RIGHT ARROW to move on!
Add Bootstrap
<html>
<head>
<title> Simple Text Portfolio </title>
</head>
<body>
<h1>My Projects</h1>
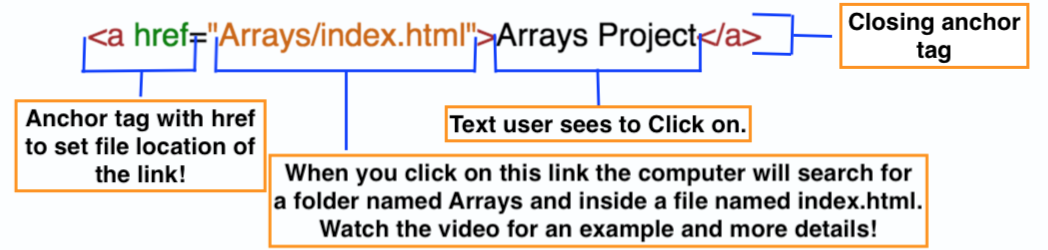
<a href="Arrays/index.html">Arrays Project</a>
<br><br>
<a href="Pong/index.html">Auto Pilot Pong Game</a>
<br><br>
<a href="Platform/index.html">Auto Controlled Enemy</a>
</body>
</html>
In the last slide you saw some screen shots of very simple portfolio designs.
In this slide you'll see how those were coded in HTML!
Also, you'll get some coding practice.
If you look to the right you'll see the code used to create The Simple Portfolio (text links only).
Take a look at the code below to review how it works, click on it for a larger view.
The Simple Portfolio
The text editor below will let you practice creating text links.
**Disclaimer** The links from this exercise are not live and will not work, this is for practice only!**
Read the steps carefully!
Notice
lines: 7, 9 & 11 are HTML links, but only line 7 is complete!
- Click on Run the Code and compare the output with the code!
- *Remember, the links won't work so if you accidentally click on one just click Run the Code again.
- Replace the X on line 9 with the words Pong Project.
Hint
<a href="Pong/index.html">Pong Project</a>
- Click Run the Code.
- Notice the link should now say Pong Project
- Replace the Y on line 11 with the words Platform/index.html.
- This tells the browser which file to load up when the link is clicked. So it would look for a folder named Platform and then inside there, a file named index.html
Hint
<a href="Platform/index.html">Pong Project</a>
- Click Run the Code.
Screenshot Portfolio
<html>
<head>
<title> Screenshot Portfolio </title>
</head>
<body>
<h1>My Projects</h1>
<div style="float:left; margin:1em;">
<a href="Arrays/arraysgame.html">
<img width="300" src="Arrays/Images/array.png" />
<p style="text-align:center;">Arrays Project</p>
</a>
</div>
<div style="float:left; margin:1em;">
<a href="Pong/autopong.html">
<img width="300" src="Pong/Images/autopong.png" />
<p style="text-align:center;">Auto Pilot Pong Game</p>
</a>
</div>
<div style="float:left; margin:1em;">
<a href="Platform/autoenemy.html">
<img width="300" src="Platform/Images/autoenemy.png" />
<p style="text-align:center;">Auto Controlled Enemy</p>
</a>
</div>
</body>
</html>
To the Right is the code to display screen shots and link those to their main project page.
Here is an example of the main working part of the code.
Click on the code for an explanation!
<div style="float:left; margin:1em;">
<a href="Arrays/arraysgame.html">
<img width="300" src="Arrays/Images/array.png" />
<p style="text-align:center;">Arrays Project</p>
</a>
</div>
The opening div tag wraps a full link and image.
You'll see three of them in the code to the right.
Each opening div tag has the properties:
float:left; - this will allow all your sections to be side by side based on their width.
margin:1em; - this puts space between each of your sections. 1em is a measurement that is based on the default. So 1em means default, 2em is twice as large as default.
Next is the link with the anchor tag and href (explained in an image above).
Inside the link is your image with it's img tag.
The img tag is has the properties:
width="300" - defines the width of your image.
src - points to the location of the image you want to display.
Next is a paragraph tag to add a text label to that section.
When you understand this slide, Click the RIGHT ARROW to move on!
Activity!
Click Here For Video Review
This Activity will walk you through:
- Configuring your local workspace (folders and coding files located on your computer) to mimic what you'll upload to GitHub.
- Creating an index.html page to be your main 'portfolio' file.
Read the next lines carefully!
- Open your workspace folder on your computer.
It's the folder where you've been saving your coding file, it will look very simliar to the screen shot in the hint below.
Hint
- Create a new folder inside your workspace and then name the new folder Website.
To create a new folder RIGHT CLICK inside the workspace and select New Folder or New > Folder (on some windows).
To rename your new folder RIGHT CLICK on the folder and select Rename.
Hint

- Drag your three files, index.html, main.css and reference.html into your new folder named Website.
Hint
- You're workspace folder should just be a folder named Website with the coding files inside.
Check hint for screenshot of what it should look like.
Hint
- Now, open Sublime text and, create a new file, File > New File
- Save your new file to your workspace (NOT INSIDE the new folder Website) and name it index.html
Hint
- Copy the code in the Hint to your new index.html file.
Hint
<html>
<head>
<title> Portfolio </title>
</head>
<body>
<h1> My Portfolio </h1>
</body>
</html>
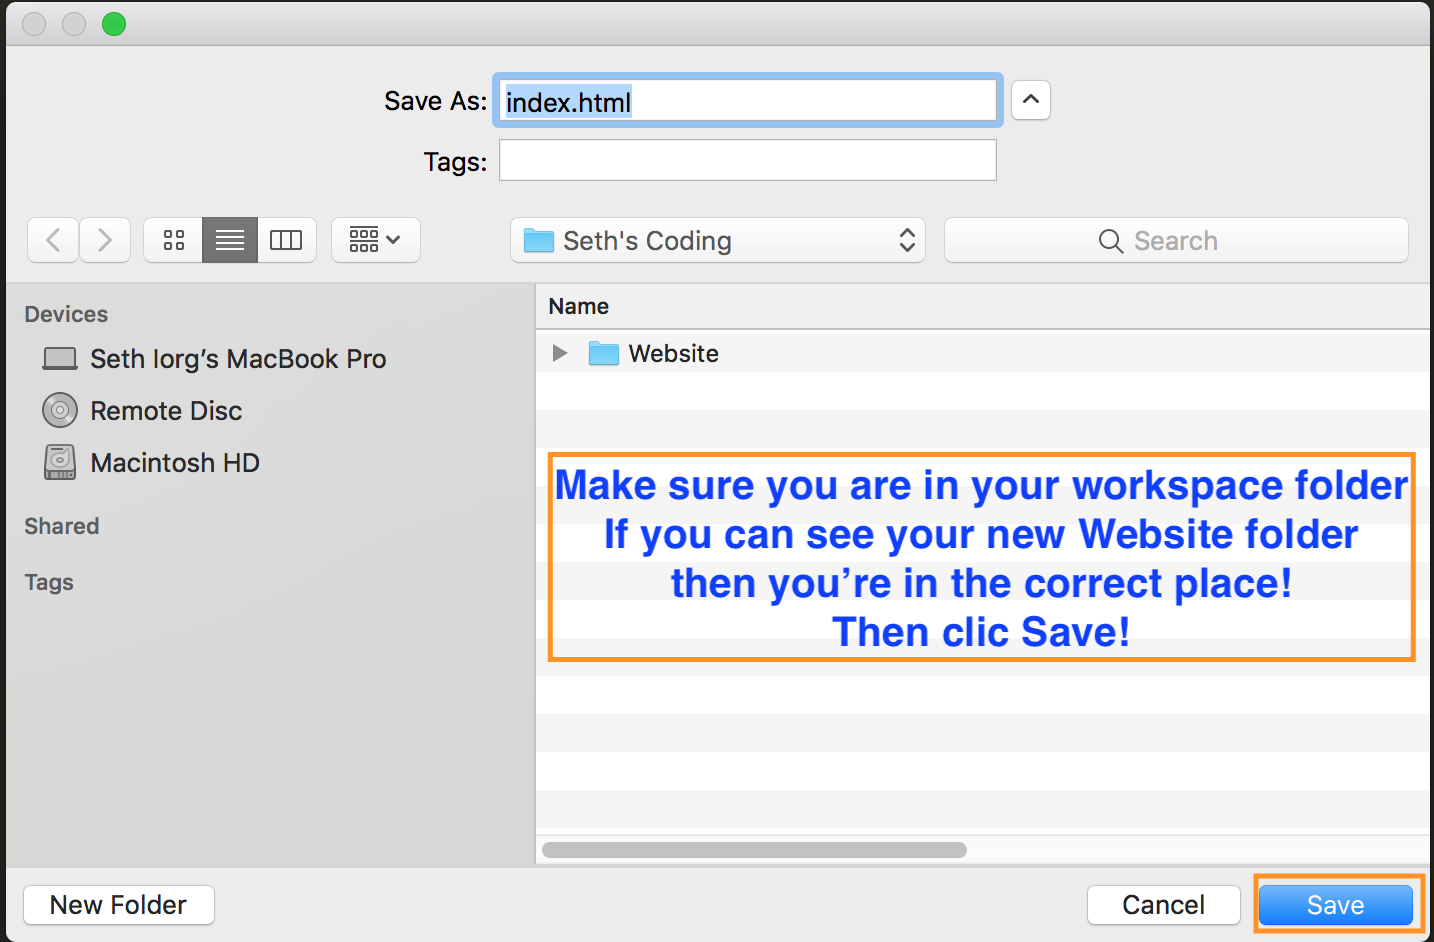
Add all this code to your index.html file.
- Make sure your main index.html file is open!
Below the h1 tag, create a link to the index.html file that's inside the Website folder.
Remember to reference your code through your new Website folder.
Hint
<html>
<head>
<title> Portfolio </title>
</head>
<body>
<h1> My Portfolio </h1>
<a href="Website/index.html">My First Website Project</a>
</body>
</html>
Only add the code in bold.
***If you have completed a different project, not the Website, then add a link referencing your new projects main page!
- Save your file and load it in the browser!
Make sure when you click on your link it takes you to your website!
- ***Optional***:
If you'd like to link an image now is a good time to set that up. You need to:
Have an image ready, either from the internet or take a screen shot.
Your image should be saved inside your workspace folder, put it in the Website folder.
Look back at the previous slide for the code on how to link an image or watch the video.
Good Luck
Great Job! When you've completed all the steps above move on to the next Lesson!